Lock system bars to make them visually even

General notation questions, including advanced notation, formatting, etc., go here.

Moderators: Peter Thomsen, miker

Post Reply
drumstudio2000
Posts: 82
Joined: Wed Jun 25, 2014 2:11 pm
Finale Version: finale 2010 and 2014
Operating System: Mac

Post by drumstudio2000 » Wed Jun 25, 2014 2:25 pm

Hi, this is my firs topic, hope u can help me. Im finale user since 2003.
This days im using finale 2010 on my mac.

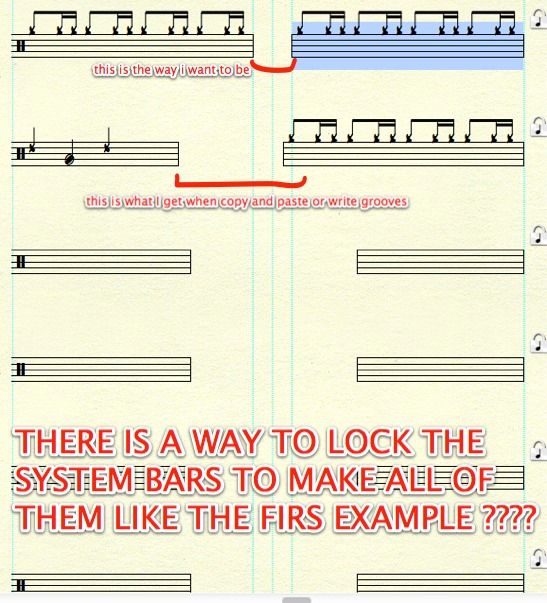
Im composing drum grooves, as shown on the following pic.
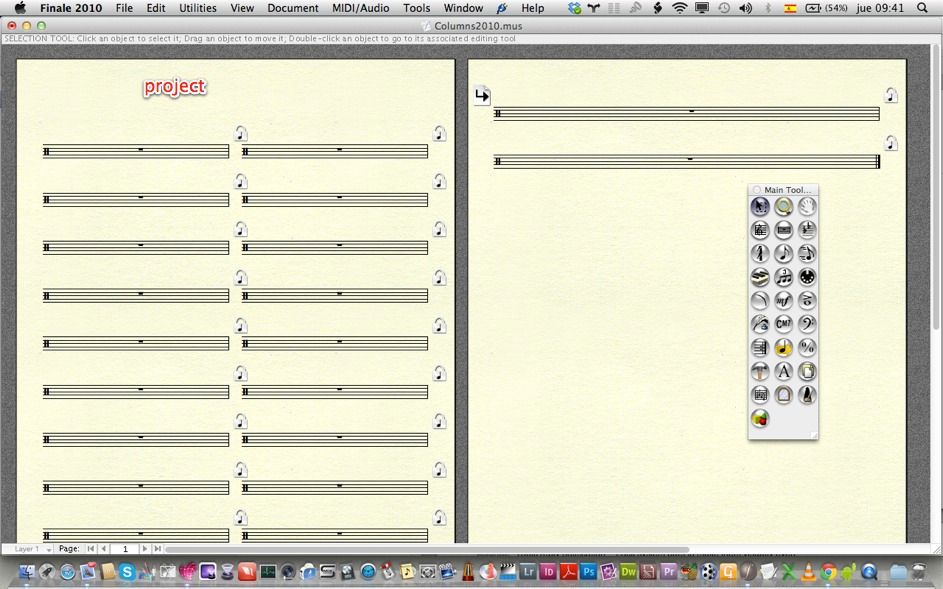
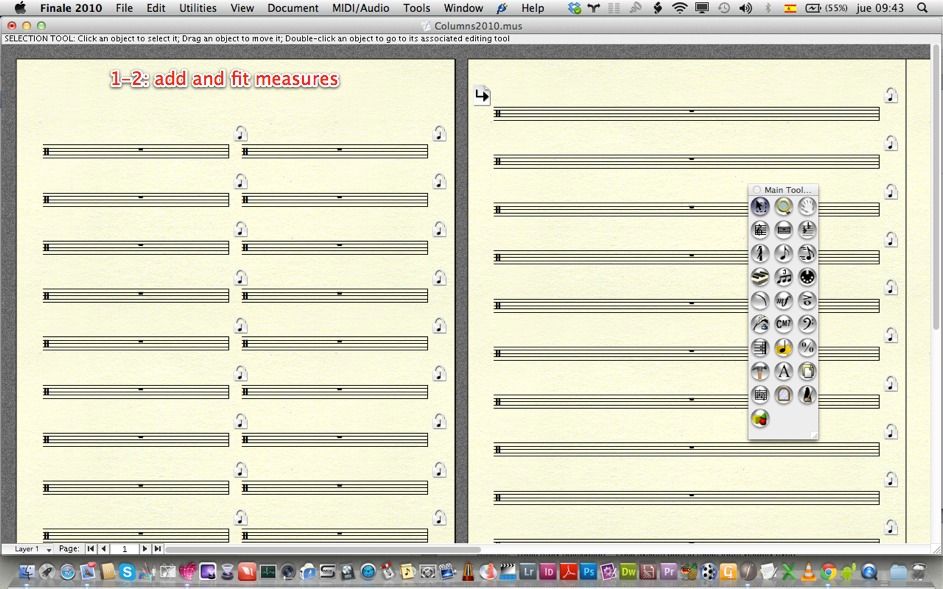
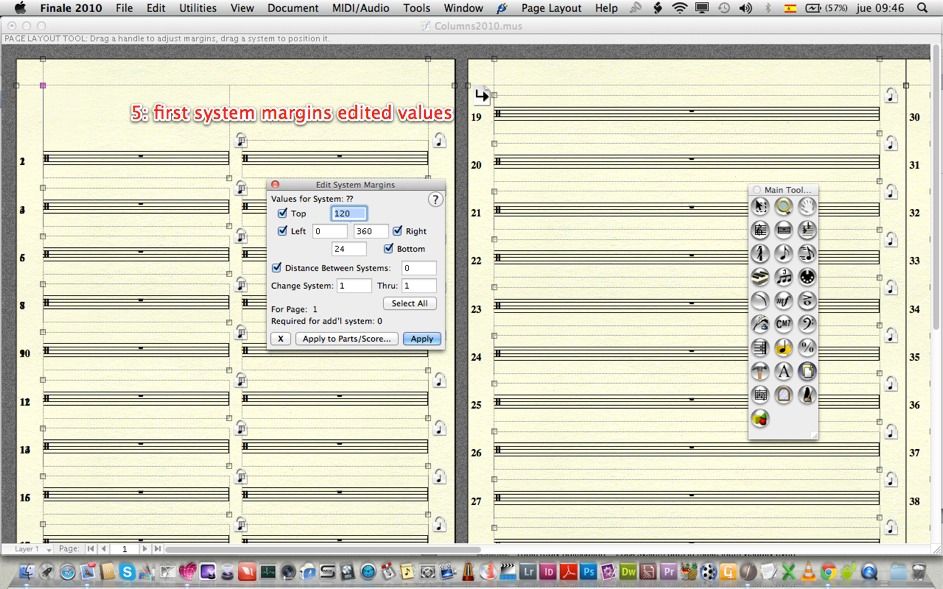
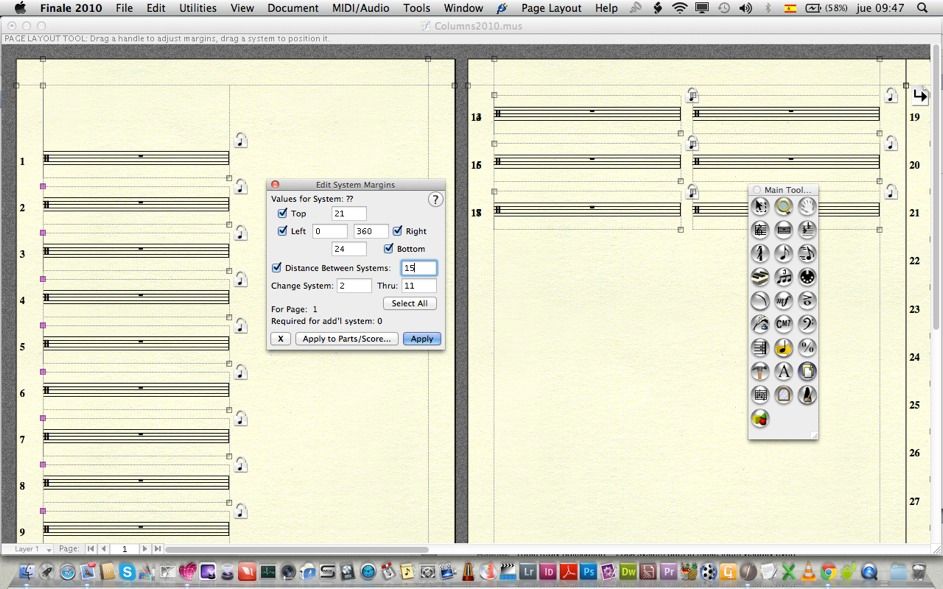
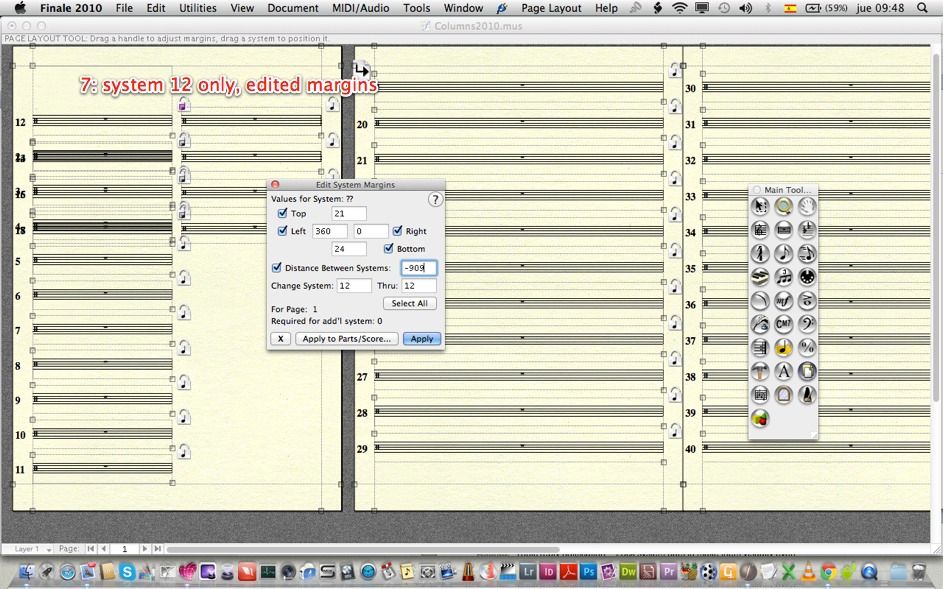
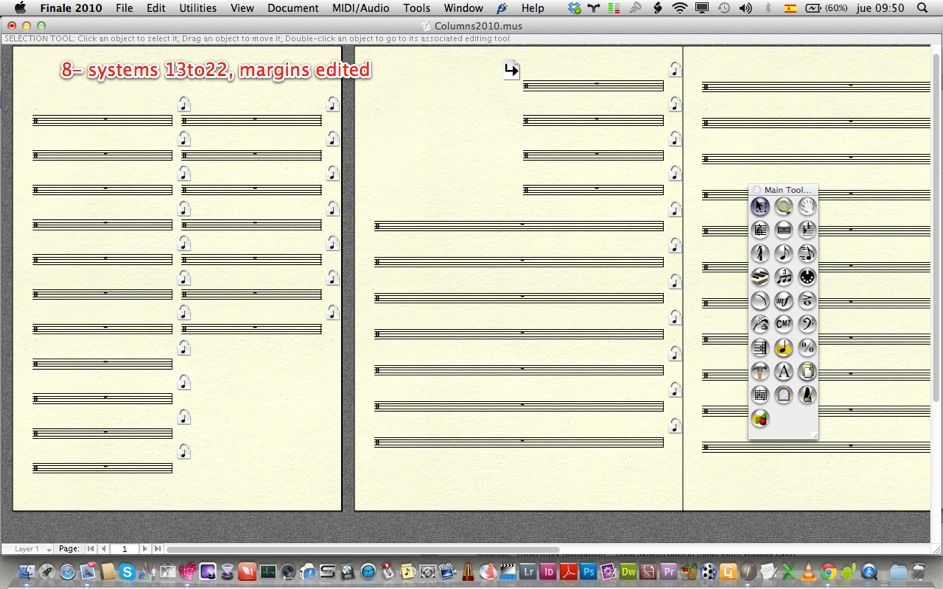
I need two columns of drum grooves, with a blank space between them.
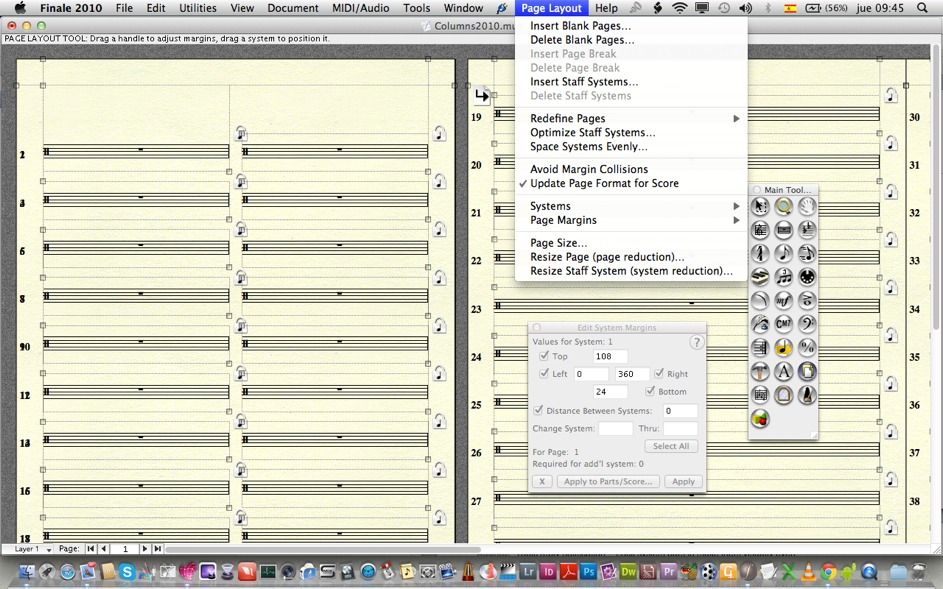
But I dont know how to make all the bar systems looks like the first one, I mean: evenly spaced between them...

I have to do it manually...but my project has 50 pages of those grooves so...

IS THERE A WAY TO SET UP SOMETHING TO MAKE FINALE DO IT FOR ME instead to do it manually?
I would appreciate any help on this
really thanks, the forum is awsome!!! :D
drum!

Ps
Oh, a last one question. On this same project, I allays need two columns of grooves with a blank space between them (i make the blank space with the staff tool, hide staff)...there is a way to copy this to other pages? Cause when I do this it copy everything, but the blank bar shows the standard 5 lines...and again, I have to hide each middle bar individually with the staff tool... :(
Thanks!!

Image


User avatar
Peter Thomsen
Posts: 6625
Joined: Fri Jul 25, 2003 6:47 pm
Finale Version: Finale v27.4
Operating System: Mac

Post by Peter Thomsen » Wed Jun 25, 2014 6:51 pm

Instead of making the blank space with the Staff Tool I would position systems next to each other.

To do so you must de-select “Avoid Margin Collisions” in the Page Layout menu.
When “Avoid Margin Collisions” is de-selected, Finale allows for negative values in system margins.

Se the attached Finale 2010 document.
Attachments
Columns2010.mus.zip
(4.96 KiB) Downloaded 211 times
Mac OS X 12.6.9 (Monterey), Finale user since 1996

drumstudio2000
Posts: 82
Joined: Wed Jun 25, 2014 2:11 pm
Finale Version: finale 2010 and 2014
Operating System: Mac

Post by drumstudio2000 » Wed Jun 25, 2014 7:11 pm

Peter Thomsen wrote:Instead of making the blank space with the Staff Tool I would position systems next to each other.

To do so you must de-select “Avoid Margin Collisions” in the Page Layout menu.
When “Avoid Margin Collisions” is de-selected, Finale allows for negative values in system margins.

Se the attached Finale 2010 document.
hi, thanks peter.

I cant replicate your template on my project...in fact...if I open your project and add more measures to it, they dont show separatly as the the ones on the first page...how to make this happen?

Image

User avatar
Peter Thomsen
Posts: 6625
Joined: Fri Jul 25, 2003 6:47 pm
Finale Version: Finale v27.4
Operating System: Mac

Post by Peter Thomsen » Wed Jun 25, 2014 7:48 pm

If you add more measures to my example document “Columns2010.mus”, they will not automatically show ”separately” as the ones on the first page.

You have to edit the system margins for each system (By The Way: each system only holds one measure).

In what order should the measures play back?

- in A) horizontal rows?
1 - 2
3 - 4
5 - 6
7 - 8

- or in B) vertical columns?
1 - 5
2 - 6
3 - 7
4 - 8

In my example document I used A), horizontal rows.

But B), vertical columns is also possible.

Are you an experienced Finale user?
I am not sure how detailed explanation you need.

Take a look at the system margins in each system.
Mac OS X 12.6.9 (Monterey), Finale user since 1996

drumstudio2000
Posts: 82
Joined: Wed Jun 25, 2014 2:11 pm
Finale Version: finale 2010 and 2014
Operating System: Mac

Post by drumstudio2000 » Wed Jun 25, 2014 8:04 pm

Peter Thomsen wrote:If you add more measures to my example document “Columns2010.mus”, they will not automatically show ”separately” as the ones on the first page.

You have to edit the system margins for each system (By The Way: each system only holds one measure).

In what order should the measures play back?

- in A) horizontal rows?
1 - 2
3 - 4
5 - 6
7 - 8

- or in B) vertical columns?
1 - 5
2 - 6
3 - 7
4 - 8

In my example document I used A), horizontal rows.

But B), vertical columns is also possible.

Are you an experienced Finale user?
I am not sure how detailed explanation you need.

Take a look at the system margins in each system.
Hi peter, thanks
I dont know what kind of finale user I am, I use it for about 10 years, but some things I know I do it my way..so, lets assume im a noob... lol

Playback is not my first interest, but my drum groove goes from up to down with the first column, then the second one.(vertical)

Ive taken a look to your project sistem margins..but dont really understand why they dont work for the second page...even if I copy and paste te margin atributes.. so yeah, im a noob. :roll:

Could u explain me how to do it on your template? Then i will try it on my own.
thanks!!!!
drum the noob :lol:

User avatar
Peter Thomsen
Posts: 6625
Joined: Fri Jul 25, 2003 6:47 pm
Finale Version: Finale v27.4
Operating System: Mac

Post by Peter Thomsen » Thu Jun 26, 2014 4:30 am

Make a backup copy of my document “Columns2010.mus”.
Name the backup copy “VerticalColumns2010.mus” (or whatever name you prefer).

We will edit “VerticalColumns2010.mus” to make it show the B) solution with vertical columns.
Open “VerticalColumns2010.mus”, and follow the steps below:

1) Add some more measures (e. g. 30 measures) to the document (Edit menu).

2) Selection Tool.
Select All.
Utilities menu > Fit Measures…
Lock the layout with 1 measure per system.

3) Page Layout Tool.
Pull down the Page Layout menu, and make sure that “Avoid Margin Collisions” is de-selected.
This is important since it will allow for negative values in System Margins.

4) Click the first system (= System 1) to select it.
Page Layout menu > Systems > Edit Margins…
(Tip: You can get there faster via the context menu)

5) Set the Top Margin to 120 Points, set the Right Margin to 360 Points, and set the Distance Between Systems to 0 Points.
Click “Apply”.
EditSystemMargins1.jpg
EditSystemMargins1.jpg (30.39 KiB) Viewed 7190 times
6) Similarly, for systems 2 to 11, set the Top Margin to 21 Points, Right Margin to 360 Points, Bottom Margin to 24 Points, and Distance Between Systems to 15 Points.
EditSystemMargins2.jpg
EditSystemMargins2.jpg (30.39 KiB) Viewed 7190 times
7) System 12 (only System 12!): Top 21 Points, Left 360 Points, Bottom 24 Points, and Distance Between Systems -909 Points.
EditSystemMargins3.jpg
EditSystemMargins3.jpg (30.62 KiB) Viewed 7190 times
8) Systems 13 to 22 as System 12, except Distance Between Systems 15 Points.

That was Page 1.
Now for Page 2:

9) Systems 23 to 34: Top 21pt, Right 360pt, Bottom 24pt, Distance Between Systems 15pt.

10) System 35 only: Top 21pt, Left 360 pt, Bottom 24pt, Distance Between Systems -993pt.

11) Systems 36 to 46: As System 35, except Distance Between Systems 15pt.

Geddit?
Mac OS X 12.6.9 (Monterey), Finale user since 1996

drumstudio2000
Posts: 82
Joined: Wed Jun 25, 2014 2:11 pm
Finale Version: finale 2010 and 2014
Operating System: Mac

Post by drumstudio2000 » Thu Jun 26, 2014 1:07 pm

Hi peter, really thanks for your detailed explanation.
I suppose im doing something wrong and its my fault, but im getting some trouble on the 8 first steps corresponding to the first page of the 2columns project. Ive triple checked, and always gets the same error...

Im doing something wrong for sure, but Ive tried to understand where is my mistake and cant find it, so I ask for your help again..
Ive captured every step so u can tell me what is going wrong. I bet is something really easy, but I cant figure it out :(
really thanks!

Image

Image


STEPS 3-4 avoid margin collisions deselected
Image

Image

step 6: systems 2to11, edited margins
Image


Image

Image

User avatar
Peter Thomsen
Posts: 6625
Joined: Fri Jul 25, 2003 6:47 pm
Finale Version: Finale v27.4
Operating System: Mac

Post by Peter Thomsen » Thu Jun 26, 2014 5:30 pm

Oops, sorry!
My mistake.
I forgot that I had inserted a Page Break on System 19.

Try this:

Page Layout Tool.
Go to System 19 (= the system on top of Page 2 - the system with the page break icon).
Click System 19 to select it.
Page Layout menu > Delete Page Break
Mac OS X 12.6.9 (Monterey), Finale user since 1996

drumstudio2000
Posts: 82
Joined: Wed Jun 25, 2014 2:11 pm
Finale Version: finale 2010 and 2014
Operating System: Mac

Post by drumstudio2000 » Thu Jun 26, 2014 7:31 pm

thanks, I think i did it well...later I will test this on more pages, but a preliminar testing went very well.
...but I have another issue. :roll:
I have my two first pages all set up correctly like u told me , now I want to import the drum grooves I have on my original project...

If I copy and paste them the dont show like hi-hat or snare notes, obviously.

I went to staff tool, notations style, and choose percussion instead standard....but it does not show anything, just let me create a new one style..


on my original project I have two drum styles already created...how can import them to this new project to let me copy and paste my grooves between them?
THANKS!
drum!

User avatar
Peter Thomsen
Posts: 6625
Joined: Fri Jul 25, 2003 6:47 pm
Finale Version: Finale v27.4
Operating System: Mac

Post by Peter Thomsen » Fri Jun 27, 2014 1:08 am

drumstudio2000 wrote:…now I want to import the drum grooves I have on my original project...

If I copy and paste them the dont show like hi-hat or snare notes, obviously.

I went to staff tool, notations style, and choose percussion instead standard....but it does not show anything, just let me create a new one style…
Your original question was a question about page layout only.
I created my demo document from a “Document Without Libraries” (= a totally empty document).

drumstudio2000 wrote:…on my original project I have two drum styles already created...how can import them to this new project to let me copy and paste my grooves between them?…
Open your original project document.
File menu > Save Library…
In the dialog box Save Library, select “Percussion Layouts”.
(While you are here, note all the items you can save in a library: Articulations, Clefs, Instruments, Shapes &c.)
Give your library a name and a place to live.

Open your new project.
File menu > Load Libray…
Load your Percussion Layout library.
Mac OS X 12.6.9 (Monterey), Finale user since 1996

drumstudio2000
Posts: 82
Joined: Wed Jun 25, 2014 2:11 pm
Finale Version: finale 2010 and 2014
Operating System: Mac

Post by drumstudio2000 » Fri Jun 27, 2014 1:54 pm

Hi peter. really thanks, u were very kind to answer all my questions.

Finally I could make the project using the way you told me. It would never come to my mind to do that way, so really thanks.
Ive learned new things thanks to you.

But after all, my intention was to reduce the amount of work used to tell finale what I want to my projec layout. 2 columns of 1 measure each, with a blank space between them.

Your way is really cool, and mine is a little rudimental and doing some kind of cheat, ie: hidding a middle measure to do the blank space...

...but if i measure the amount of work/clicks/time I did my way and compare to yours...its almost the same... doing all that system margin editings, changing numbers... there is no other way to tell finale: my project would be all this way, so I make one page (manually, margin editing, watheaver it needs) but then finale repeat that layout X amount of times automatically for me?..

I ask this because my project would be larger..more than 500 drum grooves...all that margin editing on each page really scares me... :mrgreen:

thanks!
drum!

User avatar
Peter Thomsen
Posts: 6625
Joined: Fri Jul 25, 2003 6:47 pm
Finale Version: Finale v27.4
Operating System: Mac

Post by Peter Thomsen » Fri Jun 27, 2014 8:53 pm

drumstudio2000 wrote:…there is no other way to tell finale: my project would be all this way, so I make one page (manually, margin editing, watheaver it needs) but then finale repeat that layout X amount of times automatically for me?…
You could make each page as one Finale document.
In that way you just need a template with one page.

When you have finished a page, “print” it to a PDF file.

When you have done all the pages, combine all the PDFs into one big PDF file.

Pro: You only need to set up system margins for one page
Con: It is more convenient to have all the pages in one file.
Mac OS X 12.6.9 (Monterey), Finale user since 1996

drumstudio2000
Posts: 82
Joined: Wed Jun 25, 2014 2:11 pm
Finale Version: finale 2010 and 2014
Operating System: Mac

Post by drumstudio2000 » Sat Jun 28, 2014 11:49 am

thanks peter.
There is a way to send a ticket or a form to finale programmers to maybe ask add some kind of plugin to solve this issue on "one layout to multiple pages in one document" on future releases?
thanks for all,
drum!

User avatar
Peter Thomsen
Posts: 6625
Joined: Fri Jul 25, 2003 6:47 pm
Finale Version: Finale v27.4
Operating System: Mac

Post by Peter Thomsen » Sat Jun 28, 2014 1:02 pm

drumstudio2000 wrote:thanks peter.
There is a way to send a ticket or a form to finale programmers to maybe ask add some kind of plugin to solve this issue on "one layout to multiple pages in one document" on future releases?…
Go to MakeMusic’s web site, and create a support ticket at Tech Support.
That is the proper way to make a feature request.

By The Way:
Your problem with Finale is that you on the same page need more than one default setting for system margins.
Finale does not have the option of compound default {layout settings}.

You can set system margin default values, in
Document menu > Page Format > Score…
As a (small) time saver I would set the default values as they are in the first column on Page 2.
When you add more measures to the document, Finale will create more pages - with one left column on each page.

To update already existing pages with the default settings, use
Page Layout menu > Redefine Pages > …

You will still have to create the right column on each page, though.
Mac OS X 12.6.9 (Monterey), Finale user since 1996

Post Reply